When most companies start thinking of their digital marketing, they immediately turn to social media – as opposed to Google Analytics. Many now know how much time and effort it takes, along with the amount of money it takes to make a campaign, but everyone doesn’t know how to make it all work together. However, Google Analytics can be a cohesive and powerful tool to make this happen.
In this article, I’m going to discuss how to tie all of your social media platforms into one seamless campaign using Google Analytics to track the results, so that you get the biggest “bang for your buck.”
Before Getting Started with Google Analytics You Have to Set Your Goals
First things first, you need to know the end-game. What is the purpose? What are you trying to achieve? Is it more sales? Is it a larger audience? A different audience? Plan out some time and make sure you know what you are going to be working for! Many times for a small business (or really, any business) the goal will be to increase sales, so that’s what I will focus on in this article. Just be intentional. Write down the goal.
Plan Out the Attack
Next, we need to plan out the attack. Part of this will include figuring out what happens on what platform, and even what platforms you’ll be using. It’s not much different than planning a 5-year business plan; small bites. Work backwards here. If our goal is more sales, what do we need in order to do that? What has to happen before we reach that goal? People have to pay for our service/product. Look at it this way:
Item 1 > Item 2 > Item 3 > Item 4 > GOAL: Increase sales.
In this line, we are looking for Item 4. So let’s say Item 4 is “People are buying our product.” Let’s make that note.
Item 1 > Item 2 > Item 3 > People Buy Product > GOAL: Increase sales.
Alright. Now, again, working backwards, let’s figure out what we need to do for people to be buying our product. It’s probably already listed on the website and the website is already configured for sales. Great. So we need to be sending people to the website. But what page? What product are you selling or attempting to get more sales on? Some of this may seem like a lot of kindergarten stuff, but I promise, getting a good outline and plan of attack will help in the long run, especially if you have people like me helping make it happen for you. One document or photo will help keep everyone on the same page and moving along.
So, Item 3 should be “Send more traffic to product page X.” Easy enough.
Item 1 > Item 2 > Send More Traffic to Product Page X > People Buy Product > GOAL: Increase sales.
Now how do we move people to that page? This is where a simple answer that we’ll break down later will get us going. The answer in our example will be “Push product X page on social media.” Now, we’re not going to worry about the How right now, just the plan. We’ll get into the How later.
Item 1 > Push Product X Page on Social Media > Send More Traffic to Product Page X > People Buy Product > GOAL: Increase sales.
And finally, Item 1: What needs to happen before pushing the page on social? What do we need? Answer: A manager or point-person for our social media! As the owner, you may do this yourself, or you may choose a salesperson, since they know the product intimately. Just make sure this person has the time available to do what needs to be done, and knows how to do it.
Delegate Social Media to Person A > Push Product X Page on Social Media > Send More Traffic to Product Page X > People Buy Product > GOAL: Increase sales.
Add the Details
Now that we have a plan, we need to go back and detail each item so we know who does what, and what exactly that each item entails. This is where the How comes in.
Delegate Delegate Social Media to Person A > Push Product X Page on Social Media > Send More Traffic to Product Page X > People Buy Product > GOAL: Increase sales.
Delegating the social media or taking it on yourself also means figuring out who has the usernames and passwords. Who has the access you need? Which pages or accounts are you going to be using? Based on the most recent research, the largest chunk of each daily audience is as follows:
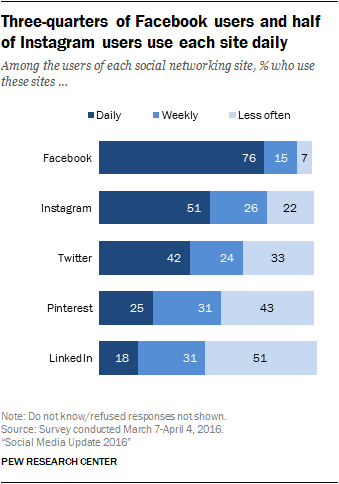
Image credit: Pew Research Center
Knowing this helps when you plan out where to spend your time and money. Please visit the research link provided above for the additional data, you’ll need to plan out your campaign. You also need to take into account what age groups are using each, to determine if that is indeed where your target audience lies. It’s nearly a year old so we are all eagerly awaiting the new research, but until then, this report does help us.
Each Item Has Its Own Tasks
So, you see how Item one (where we delegated platforms) worked. Item 2, Push Traffic to Product X Page, will also have its own tasks. Now we know what platforms, but how are we going to push our link to those pages properly? What etiquette is appropriate for each platform and each audience on that platform? We can’t come off as spammy or else people will simply ignore our messages.
So now you have a little homework to do, unless you know your audience so well that you can answer these questions already:
- Does my audience like daily, weekly, bi-weekly, or monthly reminders?
- Do they prefer links, photos, videos, or text posts – or a combo?
- How often is too often to post on this platform?
- Do my customers leave frequent reviews I can use to push the product?
- Can I use a contest or some other creative motivation to get people to buy the product?
Answering these questions can get you started. Be sure to keep each platform’s general etiquette in mind. This is easier if you’ve been a user, so delve in and use the platform yourself on a personal account so you can be more in-tune with your audience and the platform. Once you’re able to post your link on the platform without being a spambot, people will start to listen and click your link.
Note: I’m not discussing ads in this post, but that’s another possibility to push out your product on the different platforms. You can refer to my other posts for more information about Facebook ads.
Google Analytics – Analytics Everywhere!
Item 3, Send More Traffic to Product Page X, is easy enough. We’ll need to set up UTM links for our campaign, and then we just need to be able to peek through our analytics for our website.
When creating a UTM, or Urchin Tracking Module, we want to probably use the same link, but attach different platforms to it, so we will be able to differentiate the traffic later, which we’ll discuss. But they are easy to create, and Google gives us a tool to make it super-easy.
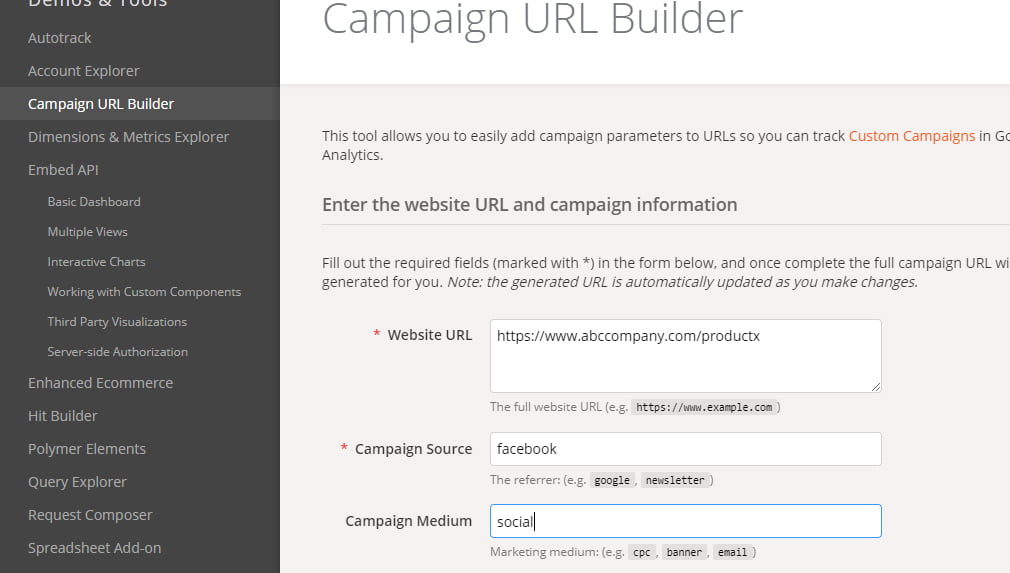
Screen capture: Roxanne Roark
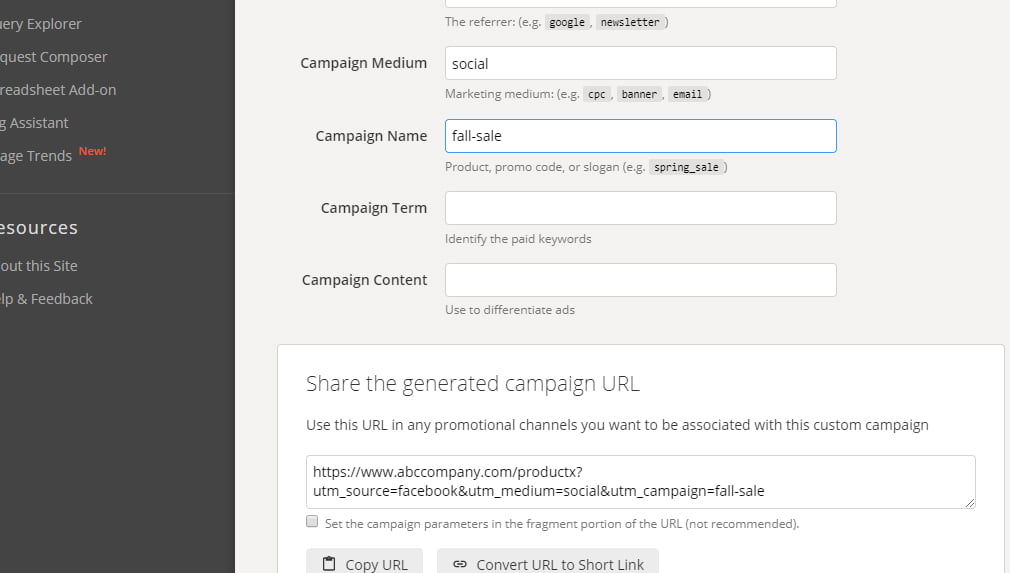
You’ll add the URL to the product page, since that’s where we are sending people in the first box, asking for the Website URL. Campaign Source will be the platform, such as Facebook (or you can use an abbreviation like FB, just make sure you’ll know what it stands for). Though it doesn’t require it, you’ll also need a Campaign Medium. This is to represent the traffic, such as is it coming from an email? From a banner ad? In the image below I’ve put in social. The last bit that Google wants (or perhaps needs) is going to be the Campaign Name.
Screen capture: Roxanne Roark
I named it fall sale. It can be whatever you want, but in order to present our information correctly, it needs these three pieces filled out. Once you are done, you’ll see the URL in the bottom box and you can click “Copy URL” from there to paste it into your social media! Create a different UTM for each platform, and you’ll be able to find out which platform is making you the most money when we look at the data.
Diving into the Google Analytics Data
To find the data we’ll be collecting on our website, most people do this through Google Analytics. Setting up a goal to find out that our traffic from social media is sending traffic to the right page AS WELL AS converting them into customers is pretty simple. We’re going to focus on someone going from our social media to the product page then buying something.
The easiest way to do this is build a URL we can track, set up the goal for a destination page (because we know what page our customers will end up on after going through a purchase), then go into a report to see what platforms they came from.
In your Google Analytics, go to the “Admin” tab on the left-hand side of the page. Select the correct Account, Property, and View for your website. Under the “View” column, click on “Goals.” Click the red “+ New Goal” button to get started.

Screen capture: Roxanne Roark
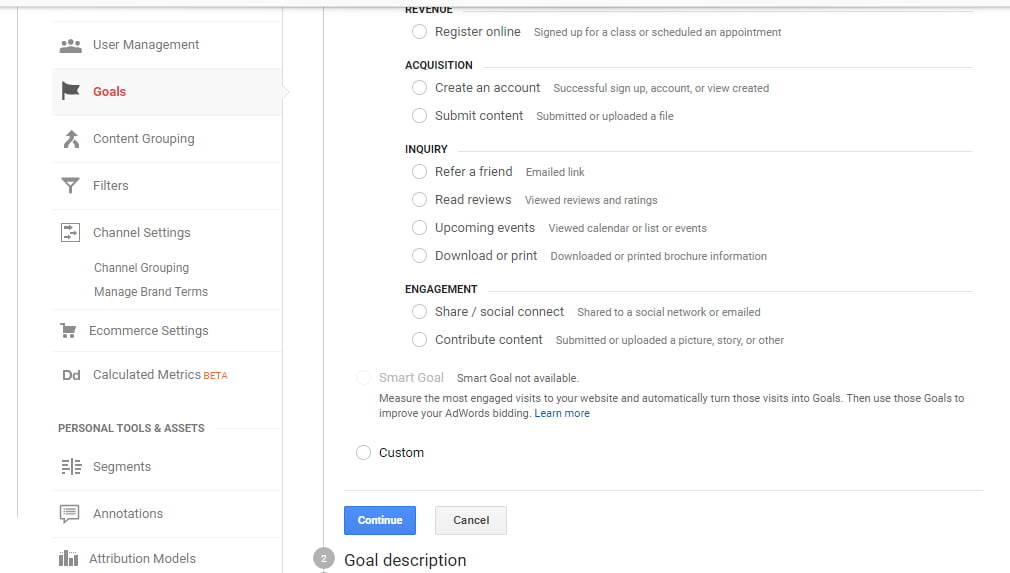
You’ll see the various templates, but just select “Custom.”
Screen capture: Roxanne Roark
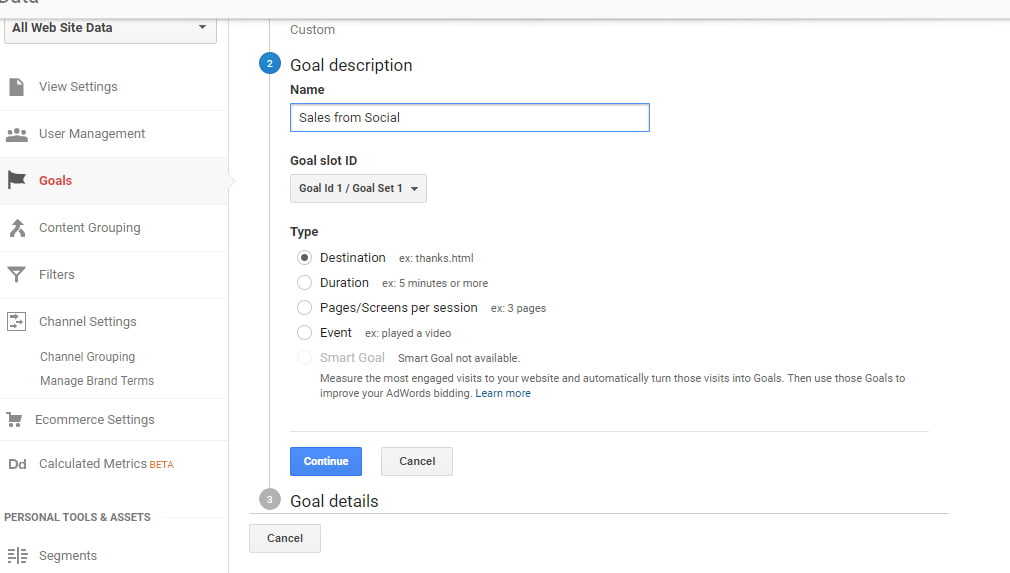
Then select “Continue.” The next “page” will let you name your goal. Be sure it’s easy. Then we will select “Destination.”
Screen capture: Roxanne Roark
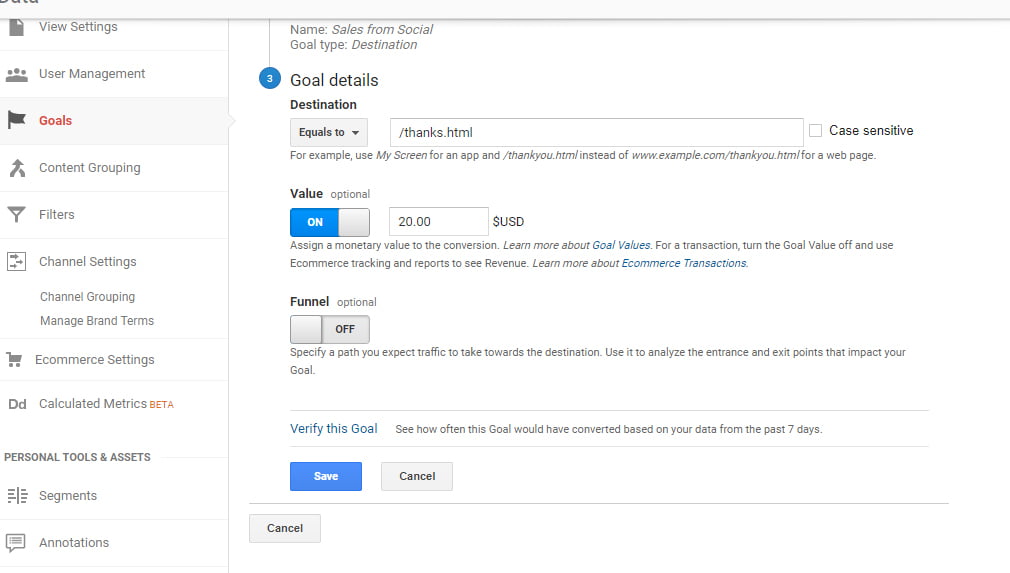
Google states: “Use destination goals to treat a pageview or screenview as a conversion. Enter the screen name or page URL in the Destination field. Specify the match type as Equals to, Begins with, or Regular expression.” For our purposes, use “Equals to” and type the URL for your confirmation or Thank you page after a purchase has been completed. In the image below you’ll see “/thanks.html” representing the confirmation page URL.
Screen capture: Roxanne Roark
Also in this image, you’ll see that I’ve added a pretend Value of $20.00 because I’m imagining we’re selling a $20.00 item. Add the correct value for your item in this box, and Google can help you track how much money in sales you’ve racked up based on this goal, per platform.
Track the Attack with Google Analytics
Using Google Analytics and by looking at the campaigns report, we can also find out if we’re reaching Items 3, 4, and 5.
Delegate Social Media to Person A > Push Product X Page on Social Media > Send More Traffic to Product Page X > People Buy Product > GOAL: Increase sales.
Now since I haven’t actually created this goal, I won’t have any photos of this. But this article does have some good advice about this topic and also shows you what it will look like. I’ll show you how to get there.
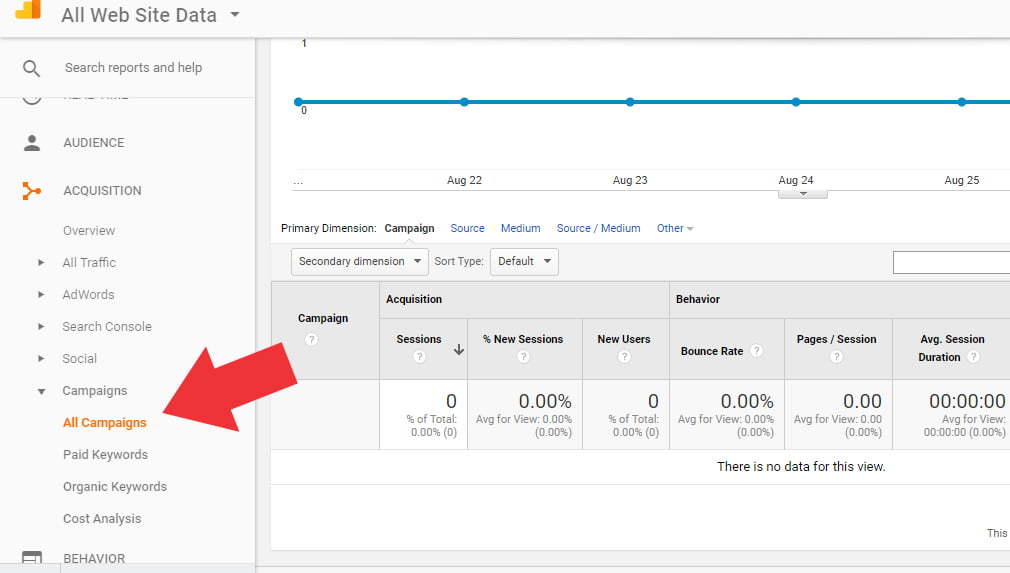
In your Google Analytics, you’ll click on “Acquisition” on the left-hand side, then “Campaigns,” and next “All Campaigns.”
Screen capture: Roxanne Roark
Here you’ll see your campaign tracking! But breaking it down further, we can get the information by platform by doing one of two things: clicking the “Secondary dimension” and choosing “Social > Social Network,” or by simply clicking the “Source” primary dimension on the top of the columns.
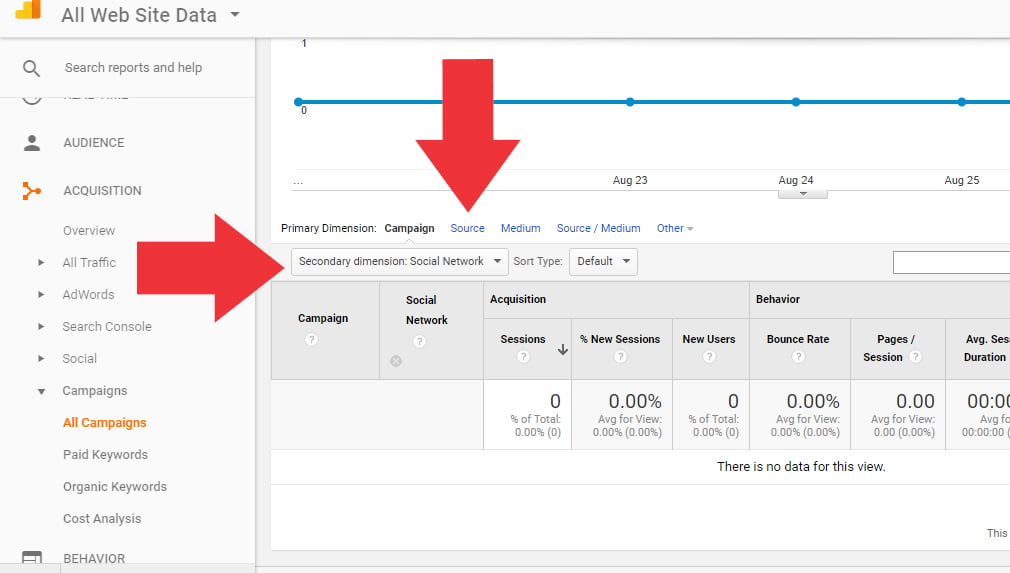
Screen capture: Roxanne Roark
Now you’ll see the campaign broken down by platform. But I would use “Source” rather than the “Secondary dimension” until you’ve created multiple campaigns (with different names).
But either way, in this report, you’ll be able to see the goal conversion rate (how well the traffic converted) and the goal value, which is the total value of the goals accomplished via traffic from that particular platform (i.e., how much money those platforms earned based on your efforts).

Screen capture: Roxanne Roark
Testing All the Things
Finally, after you’ve run a few of these types of campaigns, you’ll be able to look at all of the data and figure out if you’re reaching your goals, since Google Analytics makes it pretty easy for us to check that out! Testing other products or services, pages, images, etc. and platforms will help you find out if this kind of marketing is helping you. And if you plan ahead, you’ll be able to move seamlessly through your campaign and make sure that all of your social media marketing is well thought-out, which is crucial for any campaign.
Did you learn something new about Google Analytics and tracking ROI? What’s your next step? Jump in and share your thoughts in the comments below!
Roxanne Roark
Roxanne R. Roark is a seasoned social media marketer from Tulsa, Ok, with a passion for learning and conquering the digital space for her clients through strategic social media marketing!


